PLEASE CLICK ON THE FOLLOW BUTTON to the RIGHT.
Centers??
Written by
Monica Harty
Right! Seriously? Who has the time? Do what? When? I’m not that
creative! Daily 5? I CAN’T
GET DONE WHAT I HAVE!
I’m sure many of
you have said, out loud or to yourself, many of the above statements when you
think of using centers (literacy centers, in particular) in your classroom.
Many of you have no idea where to start, if you want to start, or how to keep
it up once you do start.
These are
precisely the concerns that prompted me to write this piece. I am by no means
an expert on this topic. I’m simply a teacher who gave it a shot and has
learned a few things along the way, mostly by trial and error. I didn’t follow
any set formula or standard. I just dove in and ratcheted up to a mostly
center-based reading classroom. I will interject some thoughts I gleaned from a
crash course on the Daily 5 in addition to my current practices and what I’ve
learned along the way. I’m offering just one person’s approach, in hopes that
it may spark something in you, so centers can become an integral part of your
classroom.
A few years ago
my eyes were really opened to the fact that students aren’t as focused and
excited about learning as they should, and hopefully could, be. It was because
of all the textbooks, workbooks, and worksheets. Periodically I would play a
game or have an activity to help teach and/or reinforce a particular concept. I
was amazed at what engaged the kids – and none of it was electronic,
computerized or had batteries – they ‘played’ games, moved pieces, used cards
and worked together. They thought it was great, never mind that they were
learning and reinforcing skills.
The first thing
you need to realize before implementing centers is that you are going to have
to alter your mindset and come out of your comfortable box. I have to admit
this was difficult for me. Like most teachers, I want control of my classroom
and a quiet environment of hard working students. This mentality had to change
to go with a centers-based approach. I have come to grips with not having
control of every minute or having a totally neat and organized classroom. I
have come to tolerate ‘learning noise’. I was also ‘granted permission’ to not
use the spelling series practice book and workbook. This was actually a
huge breakthrough for me. Once I felt I could let these go I was on my way.
I started my
voyage into center-based reading in baby steps. I began by explaining to
students what I wanted to do and why. I asked if they liked doing workbook
pages. A resounding, “No!” I asked if they liked the few activities we had done
thus far, better. A resounding, “Yea!
I then told them
I would like to do much more activity-based learning and step away from the
workbooks completely. Again, a resounding, “Yes!” I talked with them about the
importance of reading and related skills and how best to integrate those skills
into their repertoire and have fun doing so. The best way to learn and remember
something was to do it through multiple intelligences – see it, touch it, move
it, write it, play with it, manipulate it. That they understood!
Next I had to work
on ‘training the students’. In order to properly execute center-based learning,
you need a well-managed classroom. This takes some time, practice and
repetition. You have to show them each and every step. Multiply times.
You need to go over your procedures. Many times. You need to let them
know your expectations. Every day. Did I mention repetition? Stick with
it; it will pay off. I found it best to introduce only one or two centers at a
time and gradually add to this base. I constantly remind the students of the
expectations and why they’re important. One day, towards the end of January I
thought, “Wow, centers are running really smoothly today! It only took four
months into the school year to get to this point!” It was great to see students
so engaged.
After each
lesson’s work and/or assessment I asked the students to do a little
self-reflection. Did they learn anything and what helped them? This is my
favorite example: the Target Skill was Adjectives – size/shape, number and
color words. I put the three labels of adjective types on the floor in the learning
center. Students lined up. I gave each of them an adjective, had them walk to
the correct label and put the adjective card down. I repeated the procedure
handing each a noun word card, had them place it behind an adjective and read
the phrase. When discussing how an activity aided them in understanding what
adjectives are and how to use them, a few students said, “I remember walking
over to size/shape and putting my word down and then walking to the number
area.”
I will admit
that there is a LOT of organization and time that goes into creating centers.
This is what prompted establishing a Literacy Center Lending Library for our
school. Locating center activities and creating them seem to be the biggest
hurdles in using centers in the classroom. Please take advantage of available
resources and give centers a try in your classroom. Teachers who have used activities
are so happy with them.
One of the most
critical things I have learned through my journey is that there is no single,
right way to use centers. DO WHAT WORKS FOR YOU, YOUR CLASSROOM AND YOUR
STUDENTS. There are no rules to follow. The goal is to get the students
actively engaged in their learning. Organization is the key. You need to
determine a system that works for you.
I am now to the
point of seeing all the hard work pay off. My students are very eager to get to
‘Center Time’. Their weekly assessments are generally showing improvement and
most importantly, students want to learn and repeat activities. They are
simultaneously learning and having fun.
Below is an
example of how I have constructed center-based instructional practices in my
classroom. This is only intended as a guide. It is a fluid process as I find
myself constantly tweaking. I hope this give you a launching pad or a base to
customize as necessary.
Weekend: Find/create/organize
weekly activities – OR – collaborate, borrow, share, visit Teachers Pay
Teachers, etc.
Weekly
Activities: Focus on targeted skill/s (as set forth your reading series, district, CCSS,
etc.): Phonics, Word Works/Vocabulary, Comprehension
Skill and Grammar.
(I still do
writing as a whole group activity and haven’t yet worked in a fluency
station/center.)
Optional:
Folder: Contains
Weekly Directions for Centers and any worksheets, recording sheets, etc. that
are to be done individually. These are stuffed before the students come to
class on Monday. Always include some sort of recording sheet for activities in
order to have some accountability of work. This also adds another dimension of
learning, offers an opportunity to connect writing to their task, and
emphasizes personal responsibility.
Introducing
Centers:
Since my
students are trained, this is the approach I use now: introduce the week’s
targeted skills (generally using the SMARTboard) by showing, demonstrating
and/or briefly explaining the center activity as the skill in introduced.
Center
Organization:
I’m partial to
Ziploc bags (from the snack size for small pieces to the gallon size for an
entire center) for storing and displaying individual centers. I don’t have a
lot of space in my room and do not technically use ‘Centers’ or ‘Daily 5’. I
basically combined portions of both to something that works for me. I have used
two different methods, depending on the situation, students rotating to
different centers and not rotating, but coming to get a center activity and
take it back to their desk or an area on the floor to work. Some centers
require teacher assistance. For these, I call a few students at a time to come
work with me at a designated area. I try to have two separate activities/bag so
more than one student/pair of students can use a particular center.
Centers are
displayed on the whiteboard with magnets and students
come up and choose. Centers could be set in designated areas in which students
rotate.
Center Time:
Student Choice: Pass
out folders. Suggest what should be accomplished that day and the minimum
number of activities that need to be completed that day. (This will vary
depending on activity, etc.) I’ve recently found that giving students two
minutes to decide on three activities they are going to work on that day and
telling me what they are, gets them focused. I have them put an M, T, W TH, and
F behind the activity on their sheet.
Center Rotation:
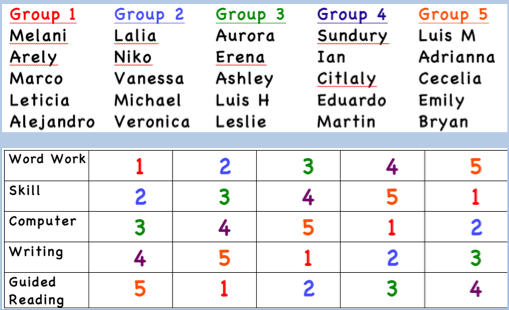
Post and/or review Rotation Schedule. See samples below.
-or-
Students working on center activities:
What does the
teacher do during center time?
The teacher can work with small groups of
students. This is where differentiation comes into play. You can adapt activities
and customize groups on the fly, as needed, for the group with which you are
working.
I know many of
you may be thinking, “But you have a small group of students and I have an
entire class of 25 plus. Of course you can manage this.” My suggestion would be
to start with just two centers. One activity could be something students can
work on independently (after directions are given) and the other activity could
be more hands-on and teacher-facilitated while the students manipulate or ‘do’
the activity.
I hope this has
been encouraging rather than discouraging! I am more than happy to talk with
you, have you come into my room, or show you what I’m doing. Please keep in
mind that this is just one approach and that you can use centers in any way
that works for you and your students.
With proper guidance and 'training', they will work, enjoy and learn!